
Create an account and find your way around
Register, verify your email, sign in and use the dashboard on a phone or computer.
Create and confirm your account
After confirming your email, your welcome email includes a short introduction, the PDF user manual and a link to the online guide. An optional getting-started reminder follows the next day; use email preferences to stop optional guides.
- Choose Create account. Enter your own name, working email, phone, address and a password with at least ten characters.
- Read and accept the Terms and Privacy Policy. An invitation code is optional during registration.
- Open our email and choose Verify my email. Check spam or promotions if it is missing. Links expire after fifteen minutes and work once.
- Sign in with your email and password. The login page has no invitation-code box. Use Forgot password if needed.
Use the dashboard
My shops shows saved projects and stores. Build my store starts a project. Products manages your catalogue; Design changes branding; Orders shows transactions; Plans & tools opens the toolkit; Invite & earn holds coupons and referral codes. Payment setup is required for online payments. My AI results and My purchases keep creative work and purchased-order records.
On a phone, use the bottom quick tools and All tools menu. Choose the correct store before editing or downloading its records. A red notice means an account, store, product or order needs attention; read its next step and contact support if the reason is unclear.
Build your business store, step by step
Prepare your real business details and follow the guided builder.
What to prepare
- Your shop name, business category and the products or services you offer.
- A working email, phone or WhatsApp number, business location and opening hours.
- Your logo or enough credits to create one; colours and a font style you like.
- A short introduction explaining what you sell and who your customers are.
Build and save
A saved project is not a public shop. Building alone does not publish your products. Missing-field notices explain what to fix; keep the page open while an upload or creation is working.
- Open Build my store from your dashboard. Follow the owner, business, brand and review steps.
- Use the available dropdowns. Write facts in your own words; use writing suggestions when helpful and check their meaning.
- Upload your logo or use the logo creator. Choose colours, font and business details.
- Review the answers and begin preparation. Follow the progress messages; preparation normally takes about two to three minutes.
- When ready, add products and preview the shop. Use My shops to return to a saved project.
Delete a shop and start another
In your vendor dashboard, open My shops and choose Delete store under the shop you want to remove. Type its name exactly and confirm. The shop and its products disappear from public view and your active shop list. You can use Start a new shop to create a replacement.
Finish open orders and resolve payment or safety reviews first. Existing order and payment records remain available for receipts, support and legal records. Deleted shops appear in My shops under Deleted stores. Request an admin restore before the displayed 30-day deadline. Admins restore the store as a private draft; existing safety and payment checks still apply. After 30 days, storefront content is permanently removed and cannot be restored. Order, payment and required support or security records are retained. Store deletion does not erase your account or transfer a paid plan to another shop.
Add, edit and bulk-upload products
Add useful details, stock and multiple images; preview everything before saving.
Add a single product
- Open Products and choose the store you want to manage.
- Choose Add product. Enter a clear name, category, price in naira, available quantity and an honest description. Add a sale price only if it is lower than the normal price.
- Upload up to six JPG, PNG or WebP photos, each within the size shown on the form (normally 5 MB). Use actual product photos and select a clear main image.
- Choose whether this product should also appear in Naija market. Review the preview, then save.
- Open the item again to change its price, quantity, wording or pictures. Replace or reorder images and save your edits.
Add several products
Use Smart bulk product upload and the downloadable example rather than guessing the columns. A batch supports up to fifty products. Include Product name and Price; optional columns include Description, Category, Sale price, Stock, SKU, Images and Marketplace. Separate several image file names with a vertical bar or semicolon.
Match your uploaded photos to the listed file names. Review each row and correct highlighted prices, quantities or missing details before saving. Importing is not permission to publish inaccurate listings. The Free product allowance is shown in your account; do not assume reward credits increase that allowance.
Change your design, publish and share
Edit your logo and image slider, then share the correct public shop link.
Make the shop your own
A draft preview is private to its owner. Customers may not be able to open an unpublished shop. Your copied link may use a store address or an enabled ShopWithNaija subdomain. Store owners on any plan can connect a separately owned domain for a one-time ₦3,500 fee per store from Domains in their dashboard after ownership, DNS and HTTPS checks. Shared storefront upgrades apply to existing shops while keeping their saved business information.
- Open Design and select the shop. Update its logo, colours, font, introduction, contact details and hours.
- Add up to five banner photos. Arrange the full-image slider, choose fit/position and check the result on a small screen.
- Save changes, preview product pages and test contact links.
- Use My shops to publish when your information and products are ready. Copy shop link from the dashboard and share it with customers.
Marketplace and vendor profiles
Naija market shows products their owners choose to list. A product must also be available and its shop public; a marketplace checkbox alone does not publish a draft. Seller profiles show the shop and eligible approved reviews. Email confirmed means the account email was confirmed; Identity checked means an authorised identity check succeeded. Neither badge guarantees delivery or removes the need to shop carefully.
Use the AI tools and find your results
Know what each tool does, check its cost and review your finished work.
The complete toolkit
- Store planning prepares a shop introduction and organisation from your business answers.
- Grammar and clarity help improves wording while preserving your facts.
- Product writing creates descriptions; promotion wording creates headlines, captions and calls to action.
- Weekly growth plans suggest practical tasks. VIP campaign planning prepares a longer campaign with goals and review points.
- Logo creation, flyer creation and product design produce images to review and download.
- The help assistant explains the service and can bring in a support person when a case needs action.
Create with confidence
Images can take up to a few minutes and progress messages are stages, not a promise of an exact completion second. Failed requests return the reserved credits. If a failure remains charged, tell support the tool and approximate time; do not share a private key. A completed result is not automatically published or applied to your shop.
- Open Plans & tools, select your store and choose a tool. Check whether your plan or credits allow it.
- Read the cost and instructions. Give exact facts, a clear purpose and any permitted reference images.
- Start creation and follow the progress panel. Do not repeatedly submit while the same request is working.
- Use the completion message to view the result. My AI results holds saved results and their own viewing pages.
- Check spelling, prices, contact details, product accuracy and permission to use the output before sharing it.
Use AI with credits on any plan
A paid plan is not required to use available AI credits. Every available AI tool can be used when your account has enough unexpired credits for that request. Coming-soon tools remain unavailable. Plans give monthly credit allowances and the listed price benefits.
If a request cannot continue, the tool shows what is missing: the number of credits required and your available balance, a shop or logo that needs to be added, a missing upload, or a temporary service limit. No credits are used when a request is rejected before generation. Failed generation returns reserved credits. Check My AI results before retrying a request interrupted by your connection.
Create flyers, logos and product concepts
Choose products, upload optional photos, set colours and download the result.
Make a flyer
Use your shop logo where required. If none is saved, upload your own or create one with available credits. Product selection does not guarantee a perfect photographic reproduction; check all product images before advertising them.
- Choose AI flyer creator and a size for your post.
- Optionally select up to six of your store's products for one flyer. You may choose no product for a brand-only design.
- Optionally upload up to three reference photos and choose design colours. Uploading references is free; it does not change your stored brand colours.
- Write the exact headline, offer, prices and contact details you want. Only use true offers.
- Create, follow progress and open the delivery popup. View the full result and download it from My AI results.
Logo and product design
The logo creator uses your business name, colours and style brief. Review it and check rights before adopting it. Product design creates a product, packaging or presentation concept in your chosen style. A concept is not proof that a real product exists and must not be passed off as an actual product photo.
Creating a new product design and then a flyer uses two separately priced generations. Reusing a saved design through Use this design in a flyer, or uploading an existing photo, adds no extra image-generation charge. The new flyer still has its own cost.
Plans, AI credits, Launch200 and invitations
Understand shared credits, expiry dates and exactly when a referral qualifies.
Plans and shared credits
Free lets you build and manage a store without a subscription. Pro is ₦15,000 for thirty days and includes 2,000 shared AI credits. VIP Growth is ₦60,000 for thirty days and includes 5,000. Paid plans do not renew automatically. Check the purchase page for payment availability and full terms.
Paid text generation uses 20 credits. Logos use 50. Flyers use 70 on Free or 50 on active Pro/VIP. Product design uses 80 on Free or 55 on active Pro/VIP. Credits are shared across eligible tools, are not money and cannot be withdrawn. VIP campaign tools still require VIP. Upcoming tools remain unavailable even with credits.
Use a coupon or invitation
Self-referrals, duplicate claims and artificial activity do not qualify. Reward credits do not change a store's plan, product allowance or selling fee. If your account shows another allowance, read its own expiry date.
- Open Invite & earn to see your balance, expiry dates, invitation link and coupon box.
- For an eligible new account in its first ten days, enter Launch200 to claim 200 credits once per account and IP address.
- Share your invitation with a different business owner. They can enter it during registration or in their dashboard within seven days, before publishing their first shop.
- The referral qualifies after that person verifies email and publishes their first shop with an active photographed product. Only then are the 200 referral credits earned.
- Use reward credits before their seven-day expiry. Paid-period credits expire with the relevant paid period; future-period credits are not available early.
Complete seller payment setup
Know the required fields and checks before accepting online payments.
Submit your business details
Payment setup is required for online checkout. A saved form is not an approval. If a verification step is unavailable or a review needs information, ask support about your case. Do not send identity documents, PINs, passwords or bank codes through ordinary chat. Email confirmation alone does not complete seller identity verification.
- Open Payment setup inside your dashboard and choose the shop.
- Complete your legal personal or registered business name, working phone and full business address. These fields are required.
- Add a CAC registration number if your business is registered. This individual field is optional.
- Read and accept the required seller agreement, then save your details for review.
- Complete the secure authorised identity and payout-account checks provided for your case. The account name must match the reviewed person or business.
Understand settlement
Where enabled, Paystack splits the transaction between the shop and Shop With Naija. Settlement can occur before the customer receives the order. Shop With Naija is not an escrow service. Confirming delivery or raising a complaint does not hold or release settlement. Do not promise otherwise to a customer.
Shop, pay and follow an order
Use the shopping bag, keep your reference and confirm receipt only after delivery.
Before you pay
- Read the product description, price, condition, stock and seller profile. Ask the shop about delivery cost and the delivery date.
- Add several items from the same shop to its bag without leaving the collection. Different shops have separate bags and checkouts.
- Use your own verified account for checkout. Check contact details, quantities and the delivery/pickup arrangement.
- At a shop with enabled online payments, continue to the Paystack payment page. If online payment is unavailable, contact the shop; do not treat a seller's private payment request as platform escrow.
- Keep the order reference and check the recorded payment status. If you paid but it is unclear, ask support before paying again.
After an order
Sellers use Orders to see paid transactions and update preparation or completion. An order requiring stock or safety review needs support attention before fulfilment. Buyers use My purchases for paid orders linked to their verified email. Confirm receipt only after receiving the items; this does not control seller settlement.
A screenshot alone is not proof of payment. Never share card PINs, CVVs, passwords or one-time codes with a seller, support person or AI assistant.
Reviews, refunds, reports and safer shopping
Give honest feedback and know how to get help with a genuine problem.
Give a verified-purchase review
Use My purchases after receiving your order. Confirm receipt and review a product actually included in your paid order. Rate the product and vendor from one to five stars and write ten to two thousand characters. Sellers cannot review their own shop. One product in one order can only be reviewed once.
Reviews are checked for abuse and private information before appearing. A negative rating alone is not grounds for rejection. Email or identity badges describe specific checks, not a guarantee against scams.
Resolve a problem
A report or suspicious-price flag is a reason to investigate, not proof of guilt. A refund request is not a completed refund. Provider processing and your bank affect timing after an approved refund. Applicable consumer rights still apply; see the Terms for more detail.
- Contact the seller with your order reference and the delivery agreement. Explain whether an item is late, wrong, damaged or different from the description.
- Keep receipts, messages and relevant photos. Remove passwords, card details and unnecessary personal information from evidence.
- Ask the support assistant for guidance. Request staff investigation when the case needs a private account, order or refund decision.
- Use Report a problem for suspected scams, impersonation, unsafe products or another safety issue. Save the report reference.
- For a restriction you believe is wrong, ask support for review and provide factual evidence. Do not create replacement accounts to evade it.
Get help and manage company emails
Use AI guidance, receive human replies and choose optional email preferences.
Ask for help
Open the ShopWithNaija help button and ask in your own words. The AI can explain forms, tools and common problems after you agree to AI processing. Choose Talk to a person if you do not want AI processing or need staff action. Do not send identity documents, passwords or financial security details.
When a request needs a person, the app creates or reuses a private ticket, shows its reference and notifies support. Allow approximately five to fifteen minutes; busy periods can take longer. The help button shows an unread sign when staff reply. Guests can provide a contact email to receive updates about their ticket.
Email choices
Account and security notices help protect your account. Optional company guides and promotions include a preferences or unsubscribe link. Changing those preferences does not stop necessary login, security, order or support messages.
For personal cases or a privacy request, use private support or email [email protected]. Blog comments are public after moderation and are not suitable for passwords, home addresses or private payment cases.
Download your business report or user manual
Save branded PDFs and CSV records from the dashboard and help centre.
Download business records
Reports include the selected store's business and design details, product records, recorded orders and plan/payment-setup status. They do not include passwords, secret keys, government identity numbers or private staff risk notes. A PDF carries a ShopWithNaija watermark. CSV files carry ShopWithNaija source information in their records; a text file cannot have a graphical watermark. Branding identifies the source and is not an audit, tax invoice, payment guarantee or settlement certificate.
- Sign in to your dashboard and open Business downloads.
- Select the shop you want. Each download is checked against the signed-in owner's stores.
- Choose PDF for a readable report, or CSV for a spreadsheet-friendly data file. Follow the preparation message and save the completed file.
- Review the report date. A report is a snapshot of the records at the time it was prepared.
- Store it securely. A business export may include order contacts and delivery details, so do not post it publicly or share it with an external AI without removing personal information.
Read offline or with your own AI
Download the watermarked user-manual PDF from the Help centre. It contains the full guide and the published Terms and Privacy Policy, with a version date. Check the website for newer versions.
For a separate AI assistant, share the public plain-text guide or llms.txt index. These documents explain public features and limits, not private account details. External AI tools may be mistaken and have their own privacy policies; the live page and your account's actual status take priority.
Fix common account, photo and AI problems
Check the right place and give support useful details without sharing secrets.
Quick checks
- Missing verification email: check the spelling, spam and promotions. Request a new link and use the newest email.
- Cannot sign in: use the registered email, verify it, and try Forgot password. Never send your password to support.
- Missing shop: check My shops and saved projects; choose the correct store. A draft is not publicly available.
- Missing marketplace product: save it as available, publish its shop and enable marketplace visibility. Check for a red restriction notice.
- Upload failure: use a supported image format within the form's size limit. Wait for upload confirmation before submitting.
- AI creation failure: read the error, confirm available credits and wait before retrying. Check the refund and saved-result history.
- Old design: save changes, reload the public link and check that you edited the right store.
- Export failure: sign in again if the session expired, select your own shop and retry after a short wait. Contact support if it continues.
Explain the issue clearly
Tell support the page or tool, what you tried, the approximate time and the exact error wording. Add a screenshot with private details removed when useful. You do not need to know technical terms. A saved report or AI result can be private, so share it only through the appropriate support conversation.
Contract staff: invitations, ranks and rewards
Join the programme, refer genuine vendors, understand the rank targets and request earned rewards.
Your private staff dashboard
Open Staff sign in to enter your private dashboard at shopwithnaija.top/staff-dashboard. The public Contract staff page explains the programme; your work is kept in a separate workspace.
Use Overview for your next task and totals, Invite vendors for your short link, My vendors for referred businesses, My rewards for requests, Rank & targets for requirements and your journey helper, Growth & awards for weekly performance, My details for your profile, and Help & guide for instructions. The desktop sidebar and mobile bottom bar keep navigation within reach.
You can use the same email or Gmail account for staff and vendor access. If you submit the staff registration form with an existing vendor email, confirm the secure link sent to that inbox. Your password and existing stores do not change. You still need to complete the staff profile and receive approval before earning.
Your staff account and private bank details
Use Contract staff on the homepage or menu. Choose Register as staff, complete your account form and confirm your email. Staff sign-in uses the same email and password as your seller account, but opens your separate staff workspace. Existing sellers do not need a second password.
Complete your public staff name, city/state and optional introduction. Add your own Nigerian bank name, account name and 10-digit account number. Government-ID verification is not required for the contract-staff programme. These rules do not remove identity or payment checks from a vendor shop. Bank details are encrypted and masked in the portal. Only the main admin can reveal the saved bank details for a requested cash reward, and the view is logged.
You agree to publish your chosen staff name, city/state, introduction and earned rank. Email, phone, bank details and cash totals are private. Active completed profiles appear in Meet our staff. Ask support to pause staff membership if you need the public profile removed.
Your short link looks like shopwithnaija.top/r/ABC12345. It is separate from an ordinary AI-credit referral link. Share it before a vendor registers. Staff invitations earn eligible cash rewards; ordinary invitations earn AI credits under their separate rules. An account can have only one original referrer.
Your portal shows a current rank badge, next milestone, each target and what remains. The free journey helper offers a progress-based checklist, or AI suggestions after your consent. Only rank totals and targets are sent to Google Gemini; names, bank and contact details are excluded. AI advice cannot grant ranks or guarantee earnings. Your welcome email includes the guide and first steps.
Before requesting a cash reward, complete your bank details. A claim saves a protected snapshot of the payment account. Bank changes are blocked while a cash claim is under review. The team checks details and arranges a manual payment. Saved account details are self-declared, not an automated identity or bank verification.
Photo approval, weekly growth and recognition
Upload your own recent real photo showing your face. A logo, another person or an AI-generated face is not acceptable. Confirm that the photo is you. The admin reviews your photo and profile before your staff account is approved. Your photo is visible only to you and authorised reviewers while pending; it becomes public with your agreed staff profile after approval. This is a staff programme photo review, not a government-ID or biometric check.
You receive an application email and an approval or correction email. Pending or rejected staff cannot use staff invitation links, request rewards or appear publicly. Replacing your profile or photo sends it back for review. Your public name, photo, location, introduction, rank and weekly/monthly SV growth appear only after approval and your agreement; bank details, contacts and cash totals remain private. Every active verified admin receives an email alert when a new staff application is submitted. The email excludes bank details and links to the private review area.
Weekly growth runs Monday to Sunday in Africa/Lagos time. Compare new qualified vendors, approved products and eligible SV with the previous complete week. The current week is unfinished, so a smaller figure is not a final performance judgement.
Staff of the Week and Staff of the Month use completed calendar periods. Only approved active staff with at least 10,000 eligible SV in that period can qualify. SV is completed buyer-confirmed vendor sales after refunded orders are excluded, before platform fees. Highest SV ranks first; ties use new qualified vendors, then new approved products, then a stable staff-code order.
AI can assist the selection explanation using anonymous performance numbers only. Names, photos, contact and bank information are never included. Recorded-activity rules preserve eligibility and ranking if AI is unavailable. AI does not decide the prize. Admin reviews and sets a cash or non-cash prize before publishing recognition. A period without a qualifying member has no winner. Each published prize creates one claimable reward, with fulfilment arranged manually.
Published recognition is a record of the reviewed award period. Figures can change after refunds or safety reviews, and unpublished selections are recalculated before publication. Awards do not guarantee employment, regular pay or future earnings.
Published recognition shows the winner’s chosen public name, photo, award period, reviewed SV and admin-set prize. It does not reveal bank details, transfer references or private payment history. Vendor-growth counts eligible referrals whose invitations were recorded in the period; product-growth counts products created in the period that pass the product checks.
Shop Value uses vendor sales, not our fees
Shop Value is based on eligible completed, buyer-confirmed customer sales by your referred vendors, excluding refunded orders. It is calculated before subtracting the platform fee or seller settlement fees. A 10,000-naira qualifying sale produces 10,000 SV even if the platform earns only 1,000 naira from it. SV is never calculated from ShopWithNaija commission or from your referral cash.
Join and refer a vendor
- Open Contract staff from the site menu, sign in and accept the programme rules. Joining is free.
- Share your personal invitation link or code before a vendor publishes their first shop. Invitations made after joining count for staff cash.
- Help the vendor confirm their email, publish a genuine shop and add at least one active product with a photo that has passed product checks.
- Open your staff portal to refresh progress. Duplicate or self-referrals and restricted vendors do not qualify.
How ranks and money work
Ranks are cumulative: Starter, Bronze, Silver, Gold, Diamond, VIP 1, VIP 2, VIP 3 and Gold VIP. Every vendor, product and Shop Value requirement must be met. Product totals are combined across referred vendors. The 700-product Diamond target carries forward at higher ranks.
Shop Value (SV) is the staff programme progress score. Each ₦1 of eligible completed, buyer-confirmed vendor sales adds 1 SV. Refunded, unresolved and self-purchased orders do not count. SV cannot be spent or withdrawn and is separate from cash rewards and AI-tool credits. The next referral rate rises from ₦65 at Starter/Bronze to ₦200 at Gold VIP. New rates apply to later qualifying referrals; existing entries keep their original rates.
Each rank incentive is earned once. Choose cash or the listed experience, never both. Experiences and land require arrangements with the team; discuss details before choosing. Chief Staff is programme recognition, not an employment contract.
Request rewards in your portal. Available, requested, paid and fulfilled have different meanings. The main admin records a cash payment only after completing the actual transfer. No automatic bank withdrawal occurs. Contact support to dispute a review.
Withdraw your staff earnings
Open My rewards in your staff dashboard. Starter staff can request a withdrawal from ₦1,000. Bronze and higher ranks can request from ₦5,000. Choose cash on an available cash milestone to add it to your balance, then use Request withdrawal.
Your full available cash balance is reserved while the request is reviewed, so the same earnings cannot be requested twice. Payment is manually arranged to the saved reward bank account. Processing can take more than 24 hours; this is not a guaranteed completion deadline. Track Under review, Processing, Paid or Not approved in Withdrawal history.
A rejected request returns its reserved balance to your available earnings with an explanation. Staff cannot approve their own payment. No fee is required to release a staff reward.
See when a referral qualifies
The staff dashboard refreshes every five seconds while visible. A genuine separate vendor must use your short staff link, verify their email, publish their shop and add an active photographed product that passes product checks. Waiting to qualify explains missing steps.
Initial product rules are checked when your totals refresh; flagged products still require review. Self-referrals, duplicate accounts, restricted accounts and restricted listings do not qualify. Ordinary invitation codes earn AI credits separately from staff rewards.
Seller levels and reputation
Understand New seller, Level 1, Level 2 and Top Rated status.
Earn your level
Your seller level is separate from your subscription and identity check. Open My seller level in your dashboard for your figures and the full threshold table.
Only completed, buyer-confirmed orders and approved purchase reviews count positively. Refunded, unresolved and self-purchased orders do not boost performance. Ratings are averaged once per reviewed order. The completion rate compares confirmed completed orders with all paid orders.
Level 1 and Level 2 update automatically when checked. Top Rated also requires approval by the main admin. If your figures drop below your current rank, a 30-day improvement period applies before a downgrade. Levels are reviewed when your dashboard or shop profile is opened. A rank describes past service and never guarantees delivery.
See your next rank
Open Seller levels inside your dashboard to see your current badge, your next rank and all required targets. The progress panel shows orders, different buyers, completed sales, rating, reviewed orders and completion rate. A free journey helper provides a checklist; optional AI planning uses only rank totals and targets.
Your current badge appears on your public storefront and vendor profile. The public profile also names the next milestone and links to the level standards. Badges record past performance and do not guarantee delivery or replace identity checks.
Connect your own store domain
Follow the illustrated five-step guide to connect your store domain. Find DNS instructions, provider links, screenshots and fixes for common connection problems.
Before you begin
Domain connection costs ₦3,500 once per store on Free, Pro and VIP plans. Changing plans does not cancel paid connection access. Buy and renew the domain with your chosen domain provider. ShopWithNaija continues to host your store. Start with www.yourbusiness.com or shop.yourbusiness.com; use a CNAME connection. A bare root domain may need your provider’s secure redirect to the www address.
Publish your shop before activation. Your existing ShopWithNaija address remains available. A custom domain does not change payment eligibility, vendor verification, order responsibilities or safety restrictions.
The setup window automatically generates each store domain's unique TXT verification record and the CNAME target. You do not need to ask an administrator for DNS records. Screenshots below use an example store and example domains: always copy the values from your own live setup window, not from a screenshot. Domain buying inside ShopWithNaija is marked Coming soon; connecting a domain you already own is available.
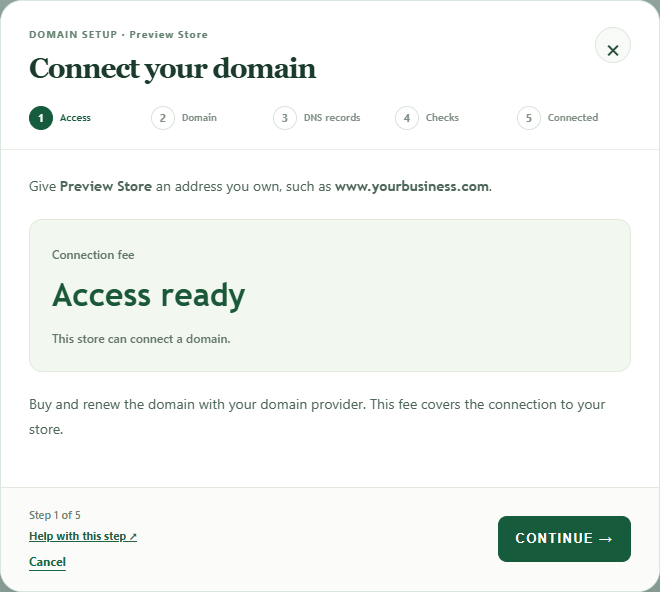
Step 1: Choose your store and review connection access
- Open your vendor dashboard, select the right store, then open Domains and choose Connect a domain.
- The Access stage shows the one-time connection fee or confirms that your store already has access. Accept the terms before opening Paystack if payment is required.
- Choose Continue when access is ready. Your domain registration and annual renewal remain separate from the connection fee.
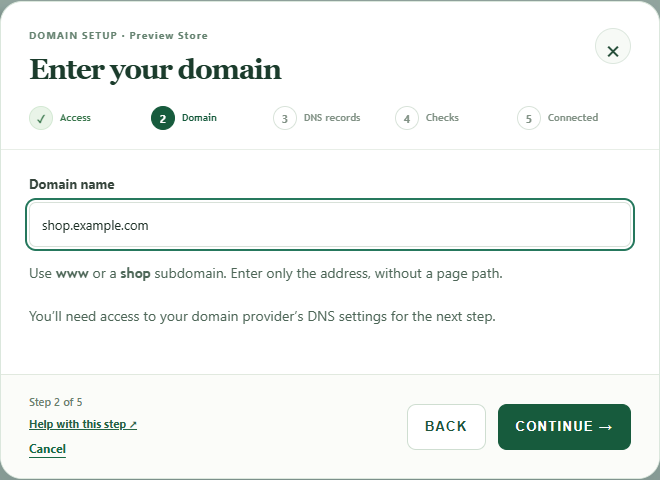
Step 2: Enter the domain address
- Use a domain you control, usually shop.yourbusiness.com or www.yourbusiness.com. Enter the domain name only, without a page path.
- Check the spelling and choose Continue. The next screen generates the records for that exact domain.
- A different domain address needs its own ownership proof; use the values shown for the address you are connecting.
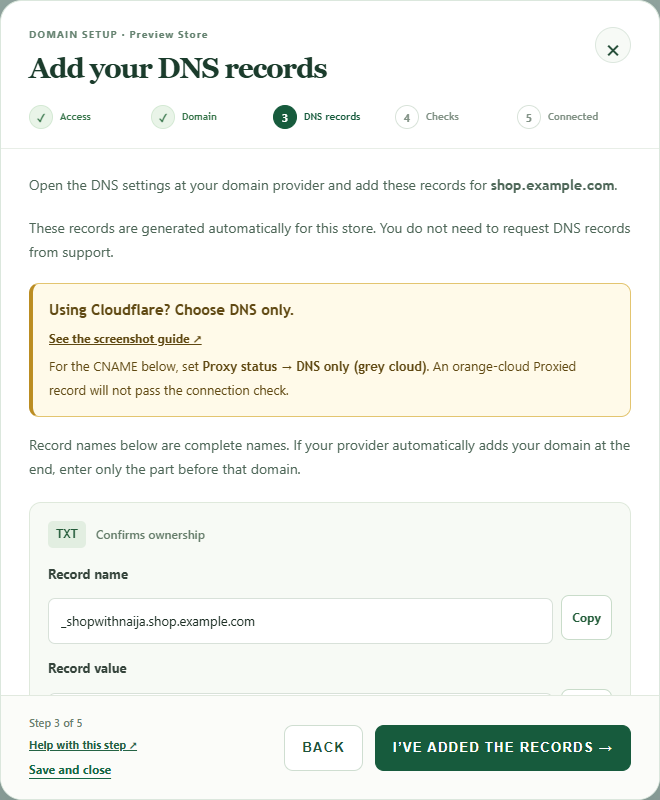
Step 3: Add the TXT and CNAME records
- Open DNS management at the provider whose nameservers control your domain. This can be different from the company you bought the domain from. Choose the provider instructions below.
- Add the TXT name and value exactly as shown in your own setup window. Keep this verification record while connected.
- Add the CNAME name and target shown in the same window. For example, in a DNS zone named yourbusiness.com, the short names are shop for shop.yourbusiness.com and _shopwithnaija.shop for its TXT record. Some providers accept the complete names shown by ShopWithNaija.
- On Cloudflare, change the CNAME proxy switch to DNS only: the cloud must be grey. Save the record. An orange Proxied cloud hides the CNAME from the connection checker.
- Keep existing email MX, SPF, DKIM, DMARC and unrelated records. If a record with exactly the same shop hostname conflicts with the CNAME, review that hostname rather than changing the whole domain or its nameservers.
- Return to ShopWithNaija and choose I have added the records. DNS records may need time to become visible.
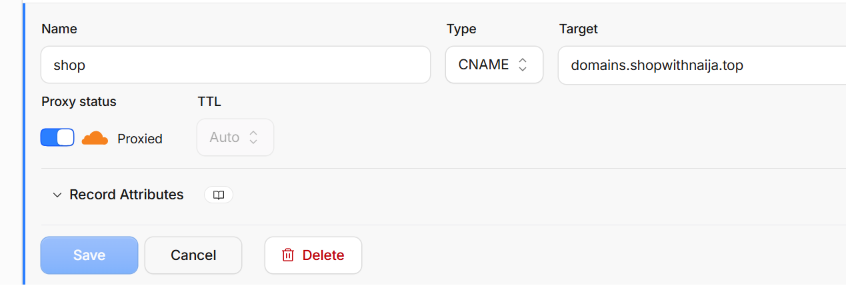
Cloudflare: turn off the orange proxy cloud
- Sign in to Cloudflare and select the domain, then open DNS and Records.
- Add or edit the CNAME. For shop.yourbusiness.com, use Name shop and Target domains.shopwithnaija.top. Keep TTL Auto.
- Click the orange Proxied switch so it changes to DNS only with a grey cloud, then choose Save. The screenshot below shows the BEFORE state that must be changed.
- Add the unique TXT record from your ShopWithNaija setup. In this example zone its short name is _shopwithnaija.shop; use the complete TXT value shown in your own dashboard.
- Return to the connection checker. If the CNAME is still hidden, confirm the saved record is DNS only and that CNAME flattening is not hiding that subdomain.
Truehost: open the DNS zone that serves your domain
- Sign in to your Truehost Nigeria client account. Open the DNS management area or DNS zone editor for the domain. If its nameservers point elsewhere, edit records at that DNS provider instead.
- Create the TXT record and CNAME from your ShopWithNaija setup. For a shop subdomain, the short CNAME name is shop. Use the exact TXT name and value supplied for your store.
- Save both records. If your Truehost service uses cPanel DNS management, follow the Zone Editor instructions below. Do not buy hosting or move nameservers just to connect the store.
Namecheap: use Advanced DNS or your active DNS host
- Sign in to Namecheap, open Domain List and choose Manage beside the domain.
- If the domain uses Namecheap BasicDNS, PremiumDNS or FreeDNS, open Advanced DNS and add the TXT and CNAME under Host Records.
- Namecheap Host fields normally use the part before your domain: shop for the CNAME and _shopwithnaija.shop for the TXT when connecting shop.yourbusiness.com. Enter the exact target and verification value from ShopWithNaija, then save.
- If the nameservers belong to your hosting provider or Cloudflare, add the records there instead of in Namecheap Advanced DNS.
GoDaddy: add the records in DNS management
- Sign in to your GoDaddy Domain Portfolio and select the domain, then open DNS.
- Add a TXT record with the name and verification value from your own setup. Add a CNAME for the shop or www subdomain pointing to domains.shopwithnaija.top.
- For shop.yourbusiness.com, GoDaddy Name normally uses shop for the CNAME and _shopwithnaija.shop for the TXT. Save the records.
- If another provider manages the domain nameservers, make these changes there instead.
cPanel: use the Zone Editor
- Open your hosting account cPanel and find Zone Editor in the Domains area. Choose Manage beside the correct DNS zone.
- Add the TXT and CNAME records from your ShopWithNaija setup. Some cPanel versions require the complete record name, so check the name that will be saved before confirming.
- Save the records. Zone Editor changes only work if the domain actually uses that hosting service for DNS.
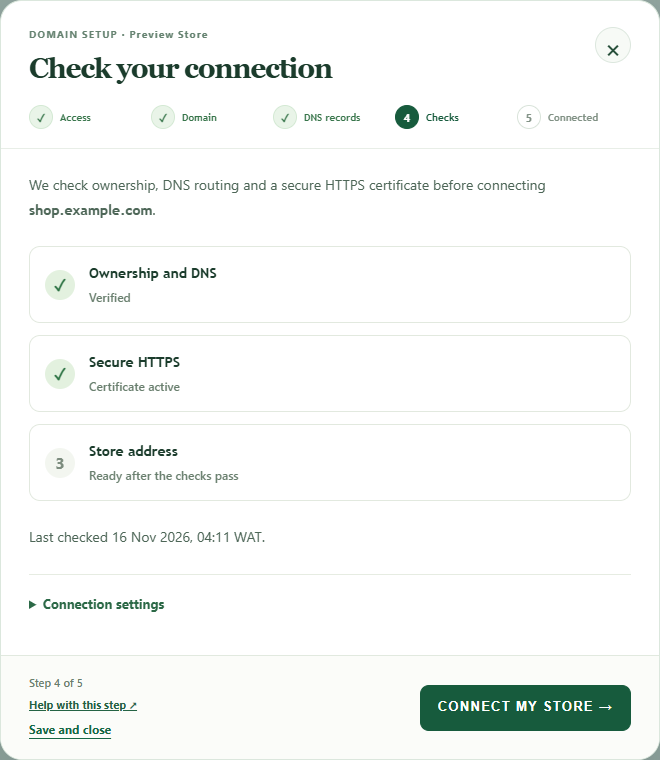
Step 4: Check DNS, publish the store and prepare HTTPS
- Choose I have added the records or Check connection in the setup window. Read the result and correct the specific record mentioned in any notice.
- If the store is still a draft, add a logo and at least one active product, then publish it from My shops. Domain settings stay saved while you do this.
- The service checks domain ownership and routing before preparing a secure certificate. Add any additional certificate-verification record shown in the setup.
- When DNS and HTTPS both show ready, choose Connect my store. You do not need an administrator to supply new records or manually connect a normal eligible store.
Step 5: Open and test your connected store
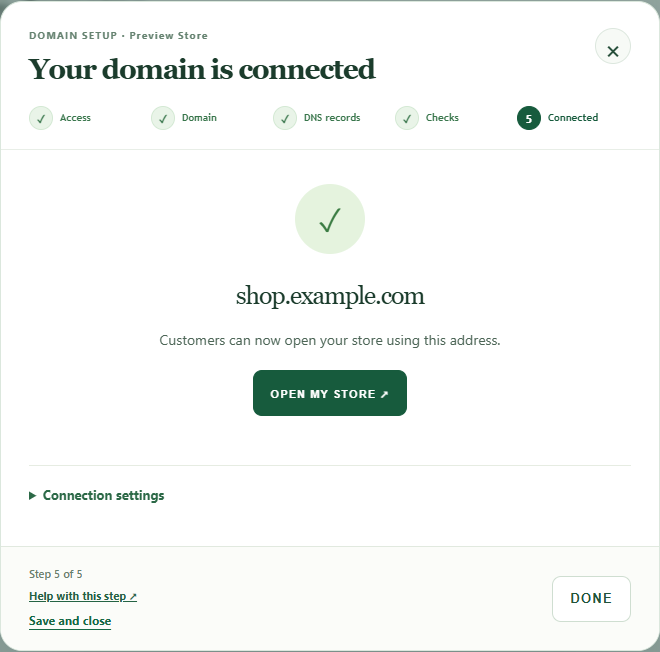
- The Connected screen shows the store domain and an Open my store link. Open it and check the store and a product page.
- The dashboard marks the chosen address Primary. Keep the ownership TXT and CNAME in place and renew your domain with its provider on time.
- If you edit DNS later and the connection stops, reopen Domains and use Check connection to identify what changed.
Fix a connection that is still waiting
- Ownership TXT missing: copy the complete value from the same domain entry in your own dashboard. Do not reuse a token from screenshots or another store.
- CNAME not visible: on Cloudflare choose DNS only and save. Check that your DNS provider did not append the domain name twice.
- Store not published: add a logo and an active product, then publish from My shops. A private draft cannot serve visitors on a custom domain.
- HTTPS pending: follow any extra certificate instructions shown and check again later. DNS changes and certificate checks are separate steps.
- No DNS editor at the registrar: use the company named in your domain nameservers. Buying a domain at one provider does not mean it manages DNS.
Shopping and account security
Store and product pages use your connected domain. Customers can add multiple products to the shopping bag on the same page. Checkout transfers the selected product IDs and quantities to the main ShopWithNaija site, where prices, stock, account access and payment eligibility are checked again.
Sign-in, admin pages, support conversations and payment processing remain on ShopWithNaija. The domain connection never grants access to your domain provider account or to another shop.
Manage, renew or remove a connection
The dashboard shows ownership, DNS, HTTPS and activation progress, with the latest check and useful error messages. Two domain addresses can be saved per shop. A domain can belong to only one shop connection.
Keep your domain registration and DNS records current. Connection access stays with this store and cannot be transferred to a replacement store after deletion. A full refund or payment dispute removes or pauses connection access; contact support for a review. Your original ShopWithNaija shop address remains available. Unpublished, deleted, suspended or banned stores are not served through a custom domain.
To disconnect, type the complete domain name in the confirmation field. Public routing is disabled first. Certificate cleanup is retried if the provider is temporarily unavailable. After cleanup, connecting the domain again requires a new ownership proof. Contact support if you acquired a domain still connected to another account.
Admin suspension requires a recorded reason. Reopening a suspended connection requires fresh verification; it does not automatically restore the previous primary address.
Still need a hand?
Ask the help assistant, or contact [email protected]. Keep passwords and payment security codes out of messages.
Get help ↗